Fungus Foils Dangerous Grapefruit Drug Interactionsbiology Online
Fungus Foils Dangerous Grapefruit Drug Interactionsbiology Online

Buy Excellent Quality Garden Spades Online At Ireland S Garden Shop.

Our Products Purple Zodiac Tapestry.
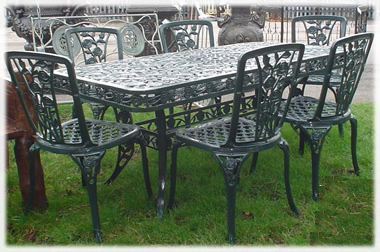
Garden Furniture A Great Garden Furniture Range Online Uk Store.

Fungus Foils Dangerous Grapefruit Drug Interactions Biology Online.

Ming S Garden 1209 Business Hwy 18 151 E Mt Horeb Wi 53572 608.

Back To Content Back To Main Menu.

Helpful Home Vegetable Gardening Tips.

Home Outdoor Planters Garden Planters Large Garden Planter Polished.

Online Free Jigsaw Puzzles Of Garden Visitors Standard Puzzle.

Light Large By The Light Garden For 36 2 Lightopia Lighting.

Fungus Foils Dangerous Grapefruit Drug Interactionsbiology Online
Decorate Your Wall with Your Own Circle Painting
Decorate Your Wall with Your Own Circle Painting

Then I have a quick and easy art project thats perfect for you.
This could be the shortest tutorial in my series of DIY art for home staging.
Put paint on bowl rim. Invert bowl on canvas. And there you have a “modern masterpiece.”
A circle is a symbol of continuity and completion. It’s a comforting and at the same time, uplifting image. Sounds to me like something every staged home should have.
In Japanese ink painting, a hand-draw circle executed with one or two brush strokes takes discipline and focus. Similar paintings of a simple, isolated circle and of multiple circles have been done by well-known American and European artists as well.
If you would like to see samples of contemporary circle paintings, here is a post by Nancy Marcus
Now you can add your name to the list of artists. We’ll cheat a little and do it the easy way.
What You Need
Invert the bowl and glue the base of the cup to the base of the bowl. This will be a handle to make lifting the bowl off the printed canvas happen without any oops.
Put paint on bowl rim. Invert bowl on canvas. And there you have a “modern masterpiece.”
A circle is a symbol of continuity and completion. It’s a comforting and at the same time, uplifting image. Sounds to me like something every staged home should have.
In Japanese ink painting, a hand-draw circle executed with one or two brush strokes takes discipline and focus. Similar paintings of a simple, isolated circle and of multiple circles have been done by well-known American and European artists as well.
If you would like to see samples of contemporary circle paintings, here is a post by Nancy Marcus
Now you can add your name to the list of artists. We’ll cheat a little and do it the easy way.
 |
| Circle prints can be small, medium or even gigantic. This medium size print hangs in the home of designer Meredith Heron. |
 |
| Russian painter Wassily Kandinskys circle painting from the early 20th century. Of course, it is handpainted, but you can see the appeal colorful concentric circles have. |
- 1 large bowl
- Throwaway plastic cup
- Hot glue gun and glue stick
- Aluminum foil
- Small amount of craft paint or leftover house paint
- 1 primed canvas bigger than the circumference of the bowl
How to Do
Invert the bowl and glue the base of the cup to the base of the bowl. This will be a handle to make lifting the bowl off the printed canvas happen without any oops.
 |
| The plastic cup gives you a handle. As an alternative, you can fashion one out of duct tape. |
Lay down a sheet of aluminum foil big enough to accommodate the inverted bowl. If you need to overlap two sheets of foil to make it big enough, place a few dabs of hot glue under the top layer of foil to keep the foil layers from shifting.
Invert the bowl onto the foil. Outline the rim of the bowl with craft paint. If using house paint, use a plastic spoon to generously drizzle a line around the bowl’s rim.
Heres where the discipline and focus come in handy. You have just one shot at this. No second guessing or slipping.
If you want more ideas to stage your own home the thrifty way, download my $4.99 eBook, DIY Home Staging Tips to Sell Your Home Fast and for Top Dollar.
 |
| I used gold paint. Black is common, but almost any color is fine, depending on your decor. |
Heres where the discipline and focus come in handy. You have just one shot at this. No second guessing or slipping.
Have your blank canvas next to your foil and bowl. Look at your canvas and decide where you will make your imprint. Lift the bowl, carefully press the rim onto the canvas, and rotate the bowl a half turn to be sure you have distributed the paint in a circle.
Lift the bowl. You can wash the paint off immediately. Use a hair dryer to heat the glue to remove the disposable cup, being carefully not to burn your fingers on the hot metal bowl. Any glue residue you can remove with acetone (nail polish remover).
Let the canvas dry in a level position to prevent any runs (unless like some artists you want the look of paint runs). Sign your name -- or even a fictitious name -- near the bottom edge of the painting
Finally, hang your handsome new artwork on that blank wall.
Let the canvas dry in a level position to prevent any runs (unless like some artists you want the look of paint runs). Sign your name -- or even a fictitious name -- near the bottom edge of the painting
Finally, hang your handsome new artwork on that blank wall.
 |
| Theres hardly any mess with this method of painting. If you recycle a disposable bowl, you can discard the bowl with the aluminum foil when youre done. |
 |
| Your circle wont look like a mechanical rendering, and thats the point. You can make it more "active" by moving the bowl around a little, or even stamping multiple times. |
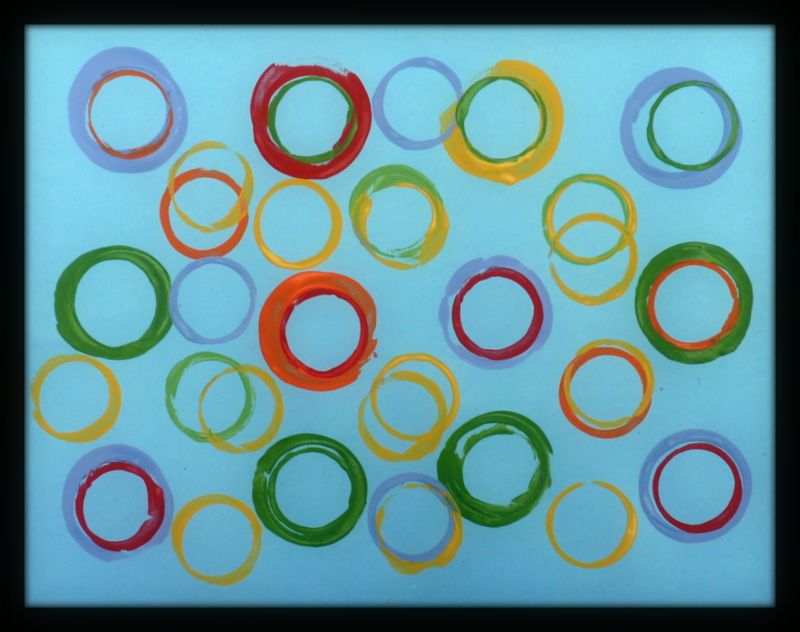 |
| Its almost impossible to create an ugly circle painting. I made these colorful prints by dipping two different size glasses in paint. Using glasses, you dont need a handle. |
Decorate Your Wall with Your Own Circle Painting
Simple Shed Plans Online How to information on home improvement detailed plans and instructions for woodworking projects Learn more
Simple Shed Plans Online How to information on home improvement detailed plans and instructions for woodworking projects Learn more
" Makes EVERY Project Easy To Tackle With Hundreds of Detailed Designs from Garden Sheds To Doll Houses ... "

 -
-
-Diy Shed Ramps - Right here Is definitely an Simple Way.
Alright, youve got a brand new storage shed and regardless in case you purchased it or built it yourself you need to uncover a method to simply transport your gardening equipment in and out. Building a set of DIY shed ramp is just the issue to allow you to simply bring your lawnmower, tiller and any other heavy gear in and out of your shed. When you construct your DIY shed ramp you have to take into account both your weight as well as the weight of ones equipment. Youd not want your DIY shed ramp to collapse the very first time you drove your ride on lawnmower out of the shed.
You have to construct your ramp having a maximum slope of 2 inches per foot of ramp length. What that signifies is that if, as an example, your shed is one foot above ground level you ramp must be at the very least 6 feet long and it wouldnt hurt to become 8 feet lengthy. Any steeper than that and it could trigger a couple problems; the blade of ones ride on lawnmower may hit the entrance of the shed or if it rains and the ramp becomes wet it may turn out to be slippery and trigger you to fall and become seriously injured.
As a minimum, you must use 4 X 4 stress treated lumber to construct the framing for your ramps, they also need to be a minimum of 16 inches apart. Id recommend when you have a ride on lawnmower that you simply build your ramp at the very least four feet wide. To do that you simply want three 4 X 4 framing members 16 inches apart. That may leave you with a six inch overhang at every single side that is perfectly acceptable. The ramp surface should also be capable of help the weight on the gear plus your weight as well. There are numerous choices that I suggest. Anything that you simply choose to make use of need to be stress treated to withstand the components. You might use either plywood or boards at the least
Simple Shed Plans Online How to information on home improvement detailed plans and instructions for woodworking projects Learn more
Home Depot Wood Shed Kits Tons of great shed plans projects to complete over the holiday weekend with your family Learn more
Home Depot Wood Shed Kits Tons of great shed plans projects to complete over the holiday weekend with your family Learn more
Woodworking tools are provided in every plan designs

 -
-
-The way to Create A Shed - Seriously, A Fool In Many Instances Can Using the Adequate Shed Plans.!
The way to Create A Shed - Truly, An Idiot Can Effortlessly Employing The proper Shed Plans.!
It may possibly be very, extremely tough to learn the best way to construct a shed in the event you never possess the knowledge.. As an example, youd want a selection of supplies and also guidance to put with each other a stronger shed as itll be recommended within this post. You are going to be able to use a storage shed to store your private patio or yard gear or perhaps landscaping related equipment. The following actions clearly show plans for building a shed.
Step 1: Generating The Frame
Level the surface as well as make it even by digging up at the same time as clearing the spot. Afterwards, location down many cinderblocks to reinforce the framework. Youll have the ability to use a energy miter saw to reduce the post for the recommended dimensions. Make sure that the ends on the posts are sliced to a forty five-degree slope ahead of time of putting all of them all through their holes more than the cinderblocks.
Step 2: Developing The Deck
Following positioning the frame into position, assemble the deck by utilizing 2x6s which are stress treated that ought to be placed vertically too as a coupled in for the frame by using a f raming nail gun. Start off out with putting within the 9-ft . sidepieces. Soon after positioning a lot of the beams in their spot, begin by establishing the 5/4 deck. But nonetheless, the 5/4 decking sections must be straight and place the very best part facing up-wards. Be specific that it overhangs the edging byhalf an inch.
Step 3: Making The Walls
When completing the decking, use the construction to construct the wall space. You are able to outline the pieces to produce the sides, foundation plate, uppermost plate, and also studs. Partition the portions to produce studs, top plate, reduce plate, as well as sides prior to securing these with using a nail gun. Then, align the wall panel to your adjacent panel and decks to produce particular that the walls are brought up. Afterward, develop a number of slimmer panels for positioning the door.
Step 4: Improving The Framing
Prior to this phase, the wall panels and also the complete wall space ought to be completely finish ahead of including 2x4s on best to make certain that the entire structure is strong even following framing. Proceed to start nailing the sheers soon after putting each on the panels up within the frame.
Step 5: Incorporating The Rooftop
You are able to choose to work with 2x6 boards to make roof structure rafters. But keep in mind, they should measure 13 inches inside the middle. Correctly attach them by employing cleats by means of OSB. Hoist the rafters to position them towards the headers. Make use of strips to hold the rooftop material, that need to be corrugated in the starting. Use nails to effectively secure the rooftop sheers.
Step 6: Installing Windows and Siding
When roof is all accomplished, create some holes for installing windows along with recessed boxes. Benefit from a reciprocating saw to renovate the vinyl siding for the outside in the shed by getting began from the corners and functioning toward the centre whilst truly sealing the corner when using the OSB nails.
Step 7: Finishing The Approach
Having the complete framework completed, build the pot plant table, entry doors, and storage cubbies. The exterior doors are from 1 sheet of plywood divided into 2 halves. Then take a plywood and nail or glue them jointly to construct storage cubbies. Paint the storage compartment doors inside a distinctive colour.
To discover regarding the easiest way to make lovely sheds, click the hyperlink or maybe
Home Depot Wood Shed Kits Tons of great shed plans projects to complete over the holiday weekend with your family Learn more
Shed Plans 12x16
Shed Plans 12x16
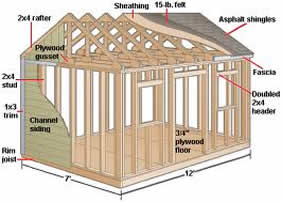
You can find websites on the internet that have 12x16 shed plans. Many of these you can download right onto your computer. This is great since it also allows you to print as many copies as you might need. Personally, I always seem to lose something at least once. Most of these blueprints will be designed for average people to understand and use them easily. Not all of us can be construction workers after all, and a simple shed should not require us to be either.
Many will have cross-sectional diagrams to show you the details, and they should also come with a materials list as well. This is an added benefit since most of us cannot look at a diagram and just know how to figure out how much we need of certain things. With the materials lists included in the shed plans 12x16 there is no guesswork. No guess works means that you will not have to worry about not having enough to finish the project, or having a bunch left over either. We do this to save money not waste it on materials that we did not need.
You can also find 12x16 shed plans that use ordinary tools as well. There is no point in ordering blueprints to save money and finding out you need hundreds of dollars in special tools after you get them. It can also be tricky trying to figure out how to use those specialty tools effectively as well. You will want plans that use simple tools like hammers, saws, screw drivers, nails, tape measures, levels and such. It does not have to be elaborate to work.
Quality is something that you can insure as well. Since you are buying the materials yourself, you can get the quality you want. No more disappointments when a package shows up and it is flimsy construction. I am sure if you are taking the time to get a shed, you are going to want it around for more than just a year or so before it is leaning or falling in. If you are getting good quality lumber and other materials, you should have your shed for quite a few years before you have to worry about it being rickety.
Find the shed design that goes well with your home, get the best shed plans by visiting us at Shed Plans 12x16
---http://shedplans12x16.wetpaint.com/---
Shed Plans 12x16
Subscribe to:
Posts (Atom)